Picking Up the Pieces

Earlier this year my father lost his battle with cancer and passed away at the age of 61.  Dad was sick for several years – it was 4 years ago in late summer when he was diagnosed with kidney cancer.  There was a 12 cm tumor (4.75”) on his kidney.  Doctors removed the tumor and kidney and thought all was well.  But a few months later spots started showing up on the CT scans – and the dreaded M word – the cancer had metastasized.  Numerous treatments were tried: surgery, immunotherapy, new cancer fighting drugs.  They all worked to a certain extent by slowing the cancer down.  But as time travelled on you could see the effects of the cancer spreading. 

Herman 1961 – 2023

Last fall I was there to help him finish getting his 1988 Dodge Power Ram back together.  He took apart the truck to fix some leaking exhaust manifolds and to do the brakes.  He couldn’t get it back together.  That’s when I saw it for the first time.  It was the beginning of the end.  Never before did I see my Dad unable to finish a project.  Dad was always able to fix anything – I watched him fix things for 38 years.

Over the last year I had to step away from most of what I was doing to be there for Dad.  I was there for the scans, appointments, and the surgeries.  I was there to talk, laugh, cry, and to watch YouTube videos.  We talked about pain.  We talked about heaven.  We talked about Jesus.  We talked about the airplanes and the airplane he wanted to build in his retirement. We talked about the next VW project on his list.  As the year continued to progress Dad was more and more fatigued.  Near the end one look at Dad’s face communicated his situation.  No longer the look of determination, but one of tiredness.  Dad was sick of fighting.  His doctor told him after the drug he was on stopped working, there was little they could do.  A few weeks after that news Dad left this world.

The last 2 years have been very tough.  My wife’s mother also passed away from a sudden diagnosis of cancer at the age of 63.  It hasn’t been easy.  My wife and I had to juggle our responsibilities as parents with young children, working, caring for sick parents and now and providing help to widowed parents.  It has been stressful.  I’ve tried to deal with stress in a positive manner.  I stepped away from non-essential work (unfortunately this blog and associated content falls in the non-essential category).  Spiritually and mentally, I have leaned heavily on my Christian worldview to sort out all the dissonance witnessing such suffering causes.  Physically I’ve turned to cycling – a positive blessing in this dark valley.  I have been regularly on the bike – time alone outside to think, reflect, and focus.

It’s not that long ago that Dad passed away.  But as I reflect, my life was blessed by a loving father.  I am thankful for that.  I know all people don’t experience this blessing.  I regularly pray for fathers in this world.  I pray that Godly men will stand up, take ownership, be responsible, and love their children as they are called to do.  It made a huge impact on my life, and it continues to impact my children’s lives. 

Dad always looked forward to a new workshop project, a new blog post, or a new YouTube video.  He loved the story aspect of it all.  Dad’s finished projects, whether it was a VW Beetle, or a new handmade lunch pail told a story of a craftsman using his skill to make something.  And the creative ability and need for man to continue to make something is as old as the day humans stepped foot on this earth.  I think it’s fitting to continue and keep telling a story here on this blog.  And in the end ultimately, this is the Master Creator’s story.  We all are created Imago Dei, hence our ability to create, and why it brings us such joy.    

Home Shop Machinists Podcast – Episode 22 – Fixtured Beer and Electro Dance Music

To confirm that we indeed are back to recording semi regularly here is another episode!  We would like to specifically thank Stefan for our very on topic podcast title!  Also many thanks to Magnus / Philter for the very brief soundbite intro (track was Sunrise from Queen of Crows).  Checkout Philter’s latest album here: https://Philter.no

Just a few of things we talk about (in no particular order):

All that and much more for another 2+ hour episode!

You can listen to the podcast here:

or you can download it directly.

Subscribe in iTunes (and please rate us!): https://itunes.apple.com/podcast/home-shop-machinists-podcast/id1180854521

Max’s website: The Joy of Precision and also his Youtube channel:  https://www.youtube.com/channel/UCdMt_havo3BxZJscvRCOGcw Max’s Instagram: https://www.instagram.com/joyofprecision/.  Also be sure to check out Max’s Patreon page: https://www.patreon.com/joyofprecision

Stefan Gotteswinter website: http://www.gtwr.de/  and also his Youtube channel: https://www.youtube.com/user/syyl  Stefan’s Instagram: https://www.instagram.com/stefan_gtwr/.  Stefan is also on Patreon: https://www.patreon.com/stefangtwr

Justin’s Youtube channel: https://www.youtube.com/thecogwheel  Justin’s Instagram: https://www.instagram.com/thecogwheel/.

Home Shop Machinists Podcast – Episode 21 – The First and The Worst

Many things have happened since we last published a podcast.  Not only has a year almost gone by, but now there are many more machining related podcasts than ever before.  We would like to remind everyone that we are the first and also the worst!  And the bad news is we are back and we hope to publish more regularly going forward.

This episode is mostly shop updates and us bantering Top Gear style about what we have been up to.

Stefan wanted us all to have a look at this thread on PM:

https://www.practicalmachinist.com/vb/deckel-maho-aciera-abene-mills/iron-tour-2015-lots-pics-301415/

You can listen to the podcast here:

or you can download it directly.

Subscribe in iTunes (and please rate us!): https://itunes.apple.com/podcast/home-shop-machinists-podcast/id1180854521

Max’s website: The Joy of Precision and also his Youtube channel:  https://www.youtube.com/channel/UCdMt_havo3BxZJscvRCOGcw Max’s Instagram: https://www.instagram.com/joyofprecision/.  Also be sure to check out Max’s Patreon page: https://www.patreon.com/joyofprecision

Stefan Gotteswinter website: http://www.gtwr.de/  and also his Youtube channel: https://www.youtube.com/user/syyl  Stefan’s Instagram: https://www.instagram.com/stefan_gtwr/

Justin’s Youtube channel: https://www.youtube.com/thecogwheel  Justin’s Instagram: https://www.instagram.com/thecogwheel/.

Home Shop Machinists Podcast – Episode 20 – Hot Shot (360)!

Stan Zinkosky of Bar Z Industrial joins us to talk about music, heating treating ovens, and the first day of summer!

Some of the things we talk about include:

And much more!  You can listen to it here:

or you can download it directly.

Subscribe in iTunes (and please rate us!): https://itunes.apple.com/podcast/home-shop-machinists-podcast/id1180854521

Many thanks to Stan for joining us.  You can follow him on Instagram https://www.instagram.com/barzindustrial/  and also on Youtube: https://www.youtube.com/channel/UCircIu8sQ-e67gH4kcb0xdA.  Here is the Bar Z Industrial page: http://www.barzindustrial.com/

Max’s website: The Joy of Precision and also his Youtube channel:  https://www.youtube.com/channel/UCdMt_havo3BxZJscvRCOGcw Max’s Instagram: https://www.instagram.com/joyofprecision/.  Also be sure to check out Max’s Patreon page: https://www.patreon.com/joyofprecision

Stefan Gotteswinter website: http://www.gtwr.de/  and also his Youtube channel: https://www.youtube.com/user/syyl  Stefan’s Instagram: https://www.instagram.com/stefan_gtwr/

Justin’s Youtube channel: https://www.youtube.com/thecogwheel  Justin’s Instagram: https://www.instagram.com/thecogwheel/.

The introduction music (Keeping Stuff Together by  Lee Rosevere) was used under a Creative Commons license.  Be sure to check out Lee Rosevere!

Carriage Stop

This is another project that has been on the to do list for quite awhile now.  I’ve been needing a slitting saw lathe carriage stop every since I bought my first lathe and have managed to put it off by using a mag base.  It was time to make a proper carriage / indicator stop for the Standard Modern 12″ Utilathe.  I designed up the stop so that you didn’t have to be constantly reaching for tools to adjust it – all the items that need to be adjusted regularly have integrated handles.  I’m using a 2″ indicator.

As Max Phillips would say I kinda went all watchmaker on it.  I didn’t intend to get this carried away but as I was working on this project I questioned myself as to why (as a society) we seem to always want to rush though things just to get them done.  Isn’t the journey where all the enjoyment comes from?  Isn’t it enjoyable and satisfying to create things that you are pleased with?

Deep within all of us is a need to be creative and make things (both tangible and not) to the best of our ability.  We are not robots.  This not a spiritual blog but I am a reformed Christian and I believe  that every single human being is created Imago Dei (in the image of God).  God creates and since we are made in His image we also create.

Back to our project.  I roughed out the lathe bed profile on the bandsaw:

and finished that portion up on the shaper:

The rest of the project was simple lathe and mill work.

This was made specifically for the Standard Modern 12″ Utilathe.  The drawings that I made up reflect that particular lathe.  But it should be very straight forward to adjust the drawings for your lathe if you wish.  If anyone wants the solid model send me an email and I will get the data to you somehow.

Also I’m considering a run of 5-10 or so of each of the tools I make for myself to sell for others.  If you want to purchase one of these stay tuned – I will update the store portion of the blog to reflect that.

Here is the drawing – Carriage Stop – Rev 01.

If you are interested here is the build video:


Slitting Saw Arbor

This is a project that has been on the to do list for quite awhile now.  I’ve been needing a slitting saw setup since day one and have managed to put it off by using the bandsaw or hacksaw for most of my work.  It was time to make a proper slitting saw arbor.

Most of the “low end” slitting saw arbors you can buy are terrible.  The spring loaded ones that can utilize multiple arbor sizes are particularly bad.  I wanted a simple design for a 1″ diameter arbor size so I machined up one in less than an evening.  I utilized a 3/4″ straight shank so I could use it in the milling machine or lathe.  If you were running very thick saws, or horizontal milling cutters (not the greatest idea in a cantilever R8 setup?) you probably would want a keyway in the design in which case I would probably make the shank taper integral to the design.

But this one is for thin slitting saws and as such no keyway is required and being held in collet is my preferred setup.

There is nothing complicated about this at all.  But to save you some time sketching or drawing here are the drawings I used: Body – Rev 01 and Cap – Rev 01.  I didn’t add a flat on the arbor for removing and replacing the saws at the bench – I might do that at a later time if I find I need it.  If so I’ll update the drawings.

If you are interested here is the build video:


CNC Router Table

It’s been a cold winter.  In an effort to help moderate the temperature in my shop I decided to add another piece of equipment.  The extra mass will help smooth out large temperature swings.  What machine did I drag home this time?  That’s a bit of a long story because I found out later that the machine I brought home wasn’t exactly the machine it was advertised as.

The machine is branded as a Torcam (not Tormach!) ~ 24″ x ~ 24″ x ~ 3″  (X / Y / Z) Router table.  It is constructed out of aluminum extrusions and utilizes linear rails and ball screws.  This was the main reason I decided to purchase the machine.  Once I saw the linear rails and ball screws (and how little the machine had been used) I was sold. After loading the machine into the Sienna, (yes we did break down and buy a minivan for our family and it has been once of the best loathed decisions we ever made!) I snapped a quick picture of my purchase:

The machine did not come with a control which didn’t bother me one bit.  I had full intentions of fitting a more up to date modern control anyway.  The very very reasonable price I purchased the machine for left plenty of funds to put together a new motion controller.

But I was curious the whole time about this Torcam company.  I had never heard of Torcam before and I didn’t do any research regarding the company beforehand.  After some digging on the internet I found out that Torcam was a machine tool distributor company out of Ontario Canada who built and sold CNC machines for the educational market.  It seems they rebranded machines for sale and it is doubtful that they actually designed and built full machines but I could be completely wrong.  It appears the were a going concern in the 1990s to early 2000s and then they disappeared.  Given the timeframe of business operations (just before the internet exploded) and what appears to be a limited market for product, very little information is easily found about Torcam and their machines today.

This machine appeared to be very well designed and assembled with care. But who actually made the machine? As soon as I purchased the machine I posted a picture on Instagram and Stefan Gotteswinter immediately commented “ISEL?”.  ISEL is a German CNC machine builder who also sells various motion components.  ISEL has been in business for a very long time and according to Stefan builds good components and machines for the price.  I think most in the industry agree that ISEL stuff is built to a price point and does the job very well.

The machine does look suspiciously German and like something ISEL would manufacture so I decided to find out.  After taking a few covers off I noticed this:

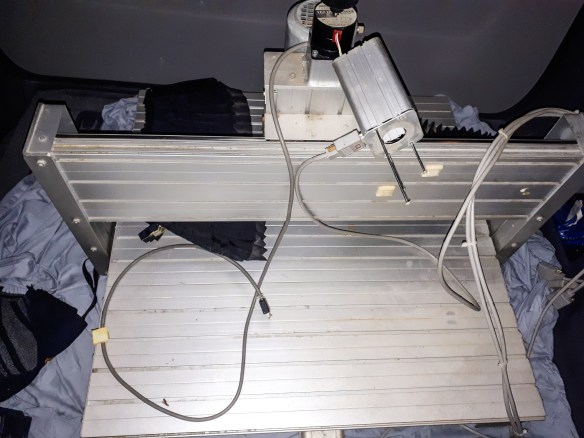
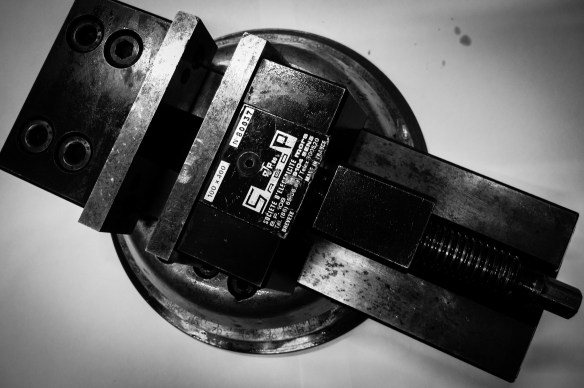
It was confirmed.  This machine was made with ISEL components and I also now had an approximate date of manufacture.  All the components say made in West Germany.  That gives you a good idea when this machine was made: early 1990s.  I suspect Torcam started importing these machines and selling them.  I don’t know what control they shipped with it (did they make their own?) but the hardware was ISEL made.

I made a video and posted it on Youtube (see below).  Shortly after posting John commented on the video: “What you have is a Techno Isel router table. Originally released in the late 80’s and early 90’s I can with what was called a machine 100 MS cos controller. Back in the day a new on would be about $ 8000 or so. I have the same machine from the 80’s it ran model and prototype production 24-7 for about two years. I mothballed it for some while then had a new controller built and I still use it today. I made a mount for. 3 h.p. Ryobi router when I first got it in 1987 and it still works like a charm. I run V carve desktop and Mach 3 on it making sings and doing woodwork. My table is 52 by 52 . By the way the stepper can get warm but they seem to convey the heat well. Never any problems running it for 10 to 12 hour runs. Just stay inside the feeds and speeds. The ball screws are a big plus but keep them clean. Like yours mine had no goers on the x and y rails.”  Thanks John!!!!

The first step in getting the machine working was building a stand.  I took a Saturday morning and put together a quick wood stand.  I would have liked to have a welded or concrete stand for it but the weather didn’t permit me working outside so I settled for wood.  Maybe in the future I might make a more substantial stand.

I also took some time to make up some leveling feet that would screw onto the legs of the stand:

Once the stand was built it was time to decide upon the motion controller.  I looked at a few options like the Centroid Acorn and Mach 4 but I decided upon LinuxCNC.  Lot’s of folks are scare of Linux but let me tell you that this was a very straight forward process to get going.  I used the Mesa 5i25 and 7i76 LinuxCNC plug and go kit.  It was pricey but is a proper motion control interface that utilizes a FPGA in the 5i25.  If you purchase the plug and go kit it has the proper firmware flashed on it already that saves you from having to re-flash the Mesa board.  Even that though isn’t as hard as it sounds!

For motors and drives I used some stuff sitting around in the shop for a few years.  I purchased 3 motors and drives used a number of years back.  The motors were 60BYGH303-13 425 ounce inch dual shaft steppers that were almost a drop replacement for the small steppers that the machine came with.  The drives were knock offs of knock offs drives.  Very little information is available for the CW230 stepper driver but I did some comparing and it appears that they are copies of the Keling KL4030 drive which seems to be based on an older Leadshine or Gecko drive.  I set them up to run at 36 volts (using a linear power supply which will probably burn out) and used 1/8 micro stepping – the highest you probably should go.  I built up a panel and put all the bits inside.  Here you can see it in progress:

Setting up LinuxCNC was a simple as wiring up the Mesa interface board, installing LinuxCNC on an older computer and running the configuration wizard.  You need to be careful to enter the information into the wizard properly.  I entered everything carefully and once done I ran LinuxCNC and moved the table around.  I used stock drive timings for the KL4030 that were directly out of the wizard.

I wired up the homing switches and tried to tidy up the wiring as best I could with some cable chain and wire loom.  Now I need to mount a spindle and start cutting out parts!  I may spend some more time tuning the drives and getting the system dialed in but so far I’m very pleased.  I’m hoping to post some more information regarding setting up LinuxCNC soon so stay tuned!

I also made a video of the work.  Have a look:


Shop Made Yo-Yos

Over 6 months ago now I finally finished a pair of yo-yos I made for family friends who gave us a wagon for our kids.  The wagon was a very well made wagon and I wanted to make a special gift for the family in return.  I remembered how much I enjoyed yo-yos when I was a kid so I decided to make up one for each of their 2 girls.

The design is very straightforward.  Essentially it is 2 aluminum halves with a tool steel axle.  I chose to make the bearing / bushing out of some Teflon I had in the shop.   You could easily modify the design to use the very common rolling element bearings that so many yo-yos utilize these days.  The trickiest part of the design is sizing the o-ring that sits in each of the halves.  The size and cross sectional area of the o-ring used determines how easily (if at all) the yo-you will return to your hand.  If you remove the o-ring completely the yo-yo may never return to your hand and probably will require what is called a “binding” trick which causes the yo-yo to recoil its string.  Since I wanted these yo-yos to be easy to use for beginners I sized the o-ring so the yo-yo will return with a easy flick of the wrist.

The project made heavy use of the 5C collet chuck that I previously reviewed.  The chuck worked out very well and the soft 5C collets that I used made the job much easier and quicker than it would have taken using the old 4 jaw standby.

I chose to press in 12 pieces of brass on the outer rim for added mass where it is needed most.  Besides making up 48 pieces of brass for 2 yo-yos the process was very easy.  After the brass was pressed in I cut the outside radii with a custom form tool I made up in the shop.  I also made a video of making the form tool.  You can watch that video here:

Besides the custom form tool for the radii, there were a number of other tools I ground up to make this yo-yo.  The project once again highlights the basic home shop need of being able to grind high speed steel tools.  If I had to purchase all the cutting tools I needed for this project the cost would have been significant.

I also did a full build video of the process.  Many thanks to Megan for recording music for the introduction.

If you are interested in the drawings you can download them here:

Body – Rev 01, Bushing – Rev 01, Axle – Rev 01, Yo-Yo – Rev 01.


Home Shop Machinists Podcast – Episode 19 – CAD

In this episode learn that Pretzel sticks are universal and one of the snacks that perhaps we home shop machinists can use to break down modern day barriers.  Or maybe join Max and have some good old fashion Americana Ritz crackers and join the 3 of us talk about CAD – a subject that we could did talk about for hours.

Some of the things we talk about include:

And much more!  You can listen to it here:

or you can download it directly.

Subscribe in iTunes (and please rate us!): https://itunes.apple.com/podcast/home-shop-machinists-podcast/id1180854521

Max’s website: The Joy of Precision and also his Youtube channel:  https://www.youtube.com/channel/UCdMt_havo3BxZJscvRCOGcw Max’s Instagram: https://www.instagram.com/joyofprecision/.  Also be sure to check out Max’s Patreon page: https://www.patreon.com/joyofprecision

Stefan Gotteswinter (our occasional host!) website: http://www.gtwr.de/  and also his Youtube channel: https://www.youtube.com/user/syyl  Stefan’s Instagram: https://www.instagram.com/stefan_gtwr/

Justin’s Youtube channel: https://www.youtube.com/thecogwheel  Justin’s Instagram: https://www.instagram.com/thecogwheel/

Home Shop Machinists Podcast – Episode 18 – NYCNC

No the podcast is not dead!  After a very large pause (for various reasons – a story for another day) the podcast is back with an episode recorded way back in September.  Nevertheless the conversation is timeless and just as applicable today as it was when it was recorded.  In this episode John Saunders, the man who went from a humble machine shop apartment in New York City to a full fledged machine shop in Ohio, joins us and talks shop.  Some of the things we talk about include:

  • CNC machine tools of all sorts!
  • CNC tooling
  • April Fools day jokes
  • SMW Johnny 5
  • Telsas, Makerspaces and the future.

And much more!  You can listen to it here:

or you can download it directly.

Many many thanks to John for taking time out of his very busy schedule and record a show with us.  John’s business is Saunders Machine Works.  He runs another page which reflects his beginnings in a New York apartment called NYCNC.  His Youtube channel: https://www.youtube.com/nyccnc.  You can follow John on Instagram: https://www.instagram.com/saundersmachineworks/.  John also is co-host of a podcast with John Grimsmo called the Business of Machining.

Subscribe in iTunes (and please rate us!): https://itunes.apple.com/podcast/home-shop-machinists-podcast/id1180854521

Max’s website: The Joy of Precision and also his Youtube channel:  https://www.youtube.com/channel/UCdMt_havo3BxZJscvRCOGcw Max’s Instagram: https://www.instagram.com/joyofprecision/

Stefan Gotteswinter (our occasional host!) website: http://www.gtwr.de/  and also his Youtube channel: https://www.youtube.com/user/syyl  Stefan’s Instagram: https://www.instagram.com/stefan_gtwr/

Justin’s Youtube channel: https://www.youtube.com/thecogwheel  Justin’s Instagram: https://www.instagram.com/thecogwheel/

Home Shop Machinists Podcast – Episode 17a – ‘Twas the Night Before Christmas

It’s been a long time since we have posted an episode and that has been my (Justin’s) fault.  I won’t go into the details but I wanted to let everyone know that the podcast will continue in the near future.  In the meantime I wanted to wish everyone a Merry Christmas and Happy and Healthy 2019 home shop machinists style.  Stay tuned!

You can listen to it directly here:

or you can download it directly.

‘Twas the night before Christmas, when all through the house,
Not a creature was stirring, so I sneaked out like a mouse.
The drill bits were placed in their index with care,
In hopes that new tooling soon would be there.

The machine tools were cleaned, and oiled in their place,
While visions of a Moore jig borer brought a smile to my face.
And while my family was inside and all snug in their beds,
I was working to finish some Christmas gifts for them instead.

When out in the shop there arose such a chatter,
I sprang from my band saw to see what was the matter.
Away to the lathe I flew like a flash,
Hitting the big red stop, it ended with a crash.

Some light on the now freshly wrecked homemade tool
Meant no new gifts would be delivered this yule.
When, what to my wondering eyes should appear,
But a Fiat Panda, and a very tall Stefan Gotteswinter.

With a little old wrench used lively and quick,
I knew in a moment he would show me his sharpening trick.
More rapid than lightening I took out the workpiece,
And I sharpened the tool to finish the gift for my niece.

“Now Hardinge, now Wrong Fu, now Deckel, and Myford!
On Linley, on Schaublin, on Monarch and Boxford,
To the Deckel clone!, to the sharpening stone!
No need to dress the CBN cone!

And then, in a twinkling, I heard “this will not do”
Stefan was examining my grinder through and through.
As I drew in my head, and was turning around,
Out of the Panda came Stefan with Biax scraper inbound.

He was soon covered in Canode from his head to his foot,
His clothes were all blue and yellow, including his boots.
The efficient German worked diligently through,
To turn my Deckel clone into something much more true.

A wink of his eye and a scrape by his hand,
Soon gave me to know I would have nothing to dread.
He spoke not a word, except for Youtube,
And educated the masses so they were no longer noobs.

Soon the Deckel was done, everything adjusted up right,
Then Stefan Gotteswinter fled back into the night.
And as he started off in his Panda to journey back home,
He rolled down his window and gestured towards the Deckel clone.

I heard him exclaim as he drove out of sight,
Merry Christmas to all and to all a good night!
Subscribe in iTunes (and please rate us!): https://itunes.apple.com/podcast/home-shop-machinists-podcast/id1180854521

Max’s website: The Joy of Precision and also his Youtube channel:  https://www.youtube.com/channel/UCdMt_havo3BxZJscvRCOGcw Max’s Instagram: https://www.instagram.com/joyofprecision/

Stefan Gotteswinter (our occasional host!) website: http://www.gtwr.de/  and also his Youtube channel: https://www.youtube.com/user/syyl  Stefan’s Instagram: https://www.instagram.com/stefan_gtwr/

Justin’s Youtube channel: https://www.youtube.com/thecogwheel  Justin’s Instagram: https://www.instagram.com/thecogwheel/

Home Shop Machinists Podcast – Episode 17 – Home $hop Machini$t

2 episodes in one month!  We can’t believe it either.  Don’t worry though we didn’t cut on quantity to get it out – this episode is still over 2 hours.  We won’t talk about the quality.  Max, Stefan and Justin give shop updates (it has been about 4 months since Stefan has been on – that’s long enough for Stefan to build an entire Saturn V rocket in his basement).  After that we talk about making money in the home $hop – when your hobby turns into a business.  And no we aren’t the Business of Machining Podcast.  In between the weirdness:

  • Stefan is busy making telescope parts for the Hubble Space telescope a local company requiring telescope parts.
  • Stefan is on the lookout for a new lathe.  He would like a Hardinge HLV (don’t we all!).
  • Justin and Max suggest looking at the Taiwanese clones like Cyclematic or Feeler
  • Stefan broke down and bought a face mill with carbide inserts:
  • Lancaster Watch Tools: https://www.instagram.com/lancaster_watch_tools/
  • Max is working on a license plate holder for his AMG.
  • Justin’s diamond dressers for the bench grinder are now for sale.  You can find them on this site.
  • Stefan is the reason why small shapers and grinders now cost an arm and a leg and everyone wants one.
  • We talk about turning your home shop into a business.  Over the past few years Stefan has done more and more work for clients.
  • Keep it a hobby – you don’t want to destroy the fun in your life!
  • Stefan does some work for this guy: https://www.instagram.com/stories/watchmaker.kl/
  • Justin is upset about all the Bang Good advertising on Youtube.

And much more!  You can listen to it directly here:

or you can download it directly.

Subscribe in iTunes (and please rate us!): https://itunes.apple.com/podcast/home-shop-machinists-podcast/id1180854521

Max’s website: The Joy of Precision and also his Youtube channel:  https://www.youtube.com/channel/UCdMt_havo3BxZJscvRCOGcw Max’s Instagram: https://www.instagram.com/joyofprecision/

Stefan Gotteswinter (our occasional host!) website: http://www.gtwr.de/  and also his Youtube channel: https://www.youtube.com/user/syyl  Stefan’s Instagram: https://www.instagram.com/stefan_gtwr/

Justin’s Youtube channel: https://www.youtube.com/thecogwheel  Justin’s Instagram: https://www.instagram.com/thecogwheel/

5C Collet Chuck

A few months ago I purchased one of the popular import 5C collet chucks for my home shop.  I’ve been investigating different ways to employ a proper collet setup in the home shop for awhile.  At first I was considering going the ER collet route and purchasing, or making, an ER collet backplate for my lathe due to the large grip range of ER collets and that they are very plentiful.  From a manufacturing engineering standpoint ER collets are not considered proper work holding collet, being designed specifically for tooling, but they actually do a good job in the home shop for work holding provided you are aware of the short comings:

  1. ER collets are generally not available in square or hexagon.  This isn’t as big of deal as it may seem – many folks use ER collets and simply grip on the the edges of non round stock.
  2. ER collets require more grip length than almost all work holding collets.  This is probably the biggest downfall to using ER collets in the home shop.  Holding onto a very short part in an ER collet in most cases is asking for trouble.  Even more sketchy would be holding onto just the edges of short square or hexagonal parts in an ER collet.
  3. ER collets require relatively high tightening torques.  This isn’t a big deal with the smaller sizes, but once you get into the larger sizes (greater than ER20) it becomes a pain.  For example ER32 is recommended to be torqued at 100 foot pounds!
  4. No emergency or soft collets available.  I suppose you could make up some soft ER collets fairly quickly though.
  5. No ER pot chucks, clutch collets, step collets, oversize collets, or whatever you want to call them.

Most of the above reasons are relativity minor when comparing ER to standard work holding collets.  Many of the above downfalls of ER collets are offset, especially when you are starting out, by the fact that you can use ER collets and collet chucks for both work holding and tool holding.  ER collets also have a very large grip range – meaning you need fewer collets to cover a range of sizes.  This can save money on tooling, which can be a big deal in the home shop and was precisely why I was seriously considering using ER as I already had a some collets in the shop.  When you consider you can purchase the ER collet backplates for less than $100 or make them easily in your home shop it’s a logical choice.

But I decided to go with a standard work holding collet, mainly for reasons 2 and 5.    I chose 5C as it is by far the most popular work holding collet available.  There is a plentiful used market and new collets are inexpensive.  Soft and clutch collets are inexpensive and I can get them next day from a local tooling supplier.

There are a few options for the actual collet chuck.  Import ones are available from numerous suppliers for below $200 and this is the route I went.  I actually ordered it off Amazon Canada.    If you are looking for something of higher reputation (note generally most of the import one are actually decent) you can purchase a standard accuracy Bison ones for around $500 with a stated .0008″ TIR.  A super precision one is available for $900 with a stated .0004″ TIR.

My import 5C collet chuck has less than .0008″ TIR, which is less than the stated accuracy of the standard Bison one at less than half the cost.  It is very well finished and so far works exceptionally well.  I have ordered inexpensive $12 emergency collets for it, and also I have been using it with a custom bored 3″ pot chuck recently for a repetitive job.  With careful loading I was indicating less than .0005″ runout on this job.

A few weeks ago now I also made a video of the chuck, including some of the mounting of it on the 2 lathes in the shop.  I recommend people to get a standard backplate one and either make up your own backplate or buy one.  By mounting the chuck on a backplate it gives you an interface to adjust the TIR to zero – if the mounting system is directly manufactured into the chuck your options are probably limited to regrinding the taper in situ to improve accuracy of the chuck.

If you are a more of your make your own tools type Andy Lofquist over at Metal Lathe Accessories has an interesting 5C collet chuck kit that you can machine yourself.


Home Shop Machinists Podcast – Episode 16 – King Tutley

After a one month hiatus due to a number of reasons (typical of home shop machining), Max and Justin are joined by the King of 16″ South Bend lathes: Tom Utley.  But nobody in the hobby calls him that.  He is King Tutley.  Tom, an engineer by day, is best know in this hobby for his time (over the last 3 years!) and dedication in taking a clapped out  second world war 16″ South Bend lathe and returning it to better than new condition.  Some of the interesting topics:

  • Tom talks about the bench grinders he has been working on that will soon be up for sale.  If you are interested in getting a properly restored Baldor bench grinder be sure to get in touch with Tom!
  • We talk about paint.  Is 2 part epoxies worth the trouble for machine tools?
  •  Previously a woodworker Tom has moved into the metal side of things.  The people are generally more friendly, albeit slightly less normal.
  • Why don’t we encourage more to work with their hands?  All three of us share our frustrations with a general society that no longer values craft work.  Shop work is good for the soul!
  • A well documented page on Tom’s journey: http://www.practicalmachinist.com/vb/south-bend-lathes/1943-south-bend-16-x-60-lathe-resurrection-299300/
  • Chemical Etching.  Tom has done a fantastic job with all the brass name and label plates on his South Bend:
  • Photo resist etching.  More popular with watchmaking types, Max talks a bit about his journey into photo resist etching:
  • Variable Frequency drives.  Tom has put a great deal of effort into the VFD controls, enclosure, and wiring has installed on his lathe.  It is one of the best executed projects of such nature on the web:http://www.youtube.com/watch?v=opxVLWTiW7E
  • Huanyang VFDs: a fine German made product?
  • The Guillocheur Video: https://youtu.be/uN-zN8OLh_w
  • Of course would the show be a show without mentioning Stefan?

And much more!  You can listen to it directly here:

or you can download it directly.

Many many thanks to Tom for coming on the show and sharing some of his story.  Tom is very active on Instagram: https://www.instagram.com/kingtutley/  We also encouraged Tom to more actively tell his story on Youtube.  Everyone subscribe to his Youtube channel!  https://www.youtube.com/channel/UCfhJT5GO9B0QwUo007XMsGQ

Subscribe in iTunes (and please rate us!): https://itunes.apple.com/podcast/home-shop-machinists-podcast/id1180854521

Max’s website: The Joy of Precision and also his Youtube channel:  https://www.youtube.com/channel/UCdMt_havo3BxZJscvRCOGcw Max’s Instagram: https://www.instagram.com/joyofprecision/

Stefan Gotteswinter (our occasional host!) website: http://www.gtwr.de/  and also his Youtube channel: https://www.youtube.com/user/syyl  Stefan’s Instagram: https://www.instagram.com/stefan_gtwr/

Justin’s Youtube channel: https://www.youtube.com/thecogwheel  Justin’s Instagram: https://www.instagram.com/thecogwheel/

Diamond Dresser

For Christmas a few months ago I made a diamond dressing tool for my brother in law.  He is a woodworker and uses his bench grinder for the initial sharpening of various wood working tools.

The tool is made up of 4 parts.  The body is a piece of steel with an angled lip (one on each side) that is used as a guide against the tool rest on the grinder.  It has a threaded hole for the diamond.  The diamond is an industrial diamond held in a steel rod – commonly used in surface grinding dressers, modified with threads along most of its length.  There is a lock nut and o-ring (to provide some cushion when tightening the nut down) and a handle nut to adjust the distance from the lip to the edge of the diamond.

The tool is useful for most sizes of standard bench grinders as the body has 2 different lip offsets.  The threaded diamond is also allows for generous positioning.

After giving him the tool I explained a few of the benefits of such a tool versus a traditional spur style tool:

  • The amount of grinding wheel material removed is easily controlled as the distance on the single point tool is adjustable.
  • A single point diamond tool does a better job at getting the wheel round in the first place.  This is because the forces involved are significantly less than traditional spur type tools, or even the newer T style diamond tools.  Forcing traditional tools up against the wheel isn’t a very steady process and the entire tool floats on the surface of the wheel.  In addition your hand can move back and forth with the high and low points on the wheel.  As such I’ve found single point tools create a wheel that is rounder, which helps with balancing.  (Grinder balancing always happens after a wheel has been dressed).
  • Unlike spur tools or the cheap T style dressers a properly used diamond tool lasts a long time on a bench grinder and also is very durable for various wheel materials.

After Christmas I finished up a tool for Max over at the Joy of Precision:

I made up a full set of drawings of the tool if you would like to make one yourself:

Body – (Rev 01) Diamond – (Rev 01) Handle Nut – (Rev 01) Lock Nut – (Rev 01) Dressing Tool – (Rev 01)

I’ve also had a fair bit of interest in people asking if they could buy one of these tools.  I’m making up a number of them for others so if you are interested send me an email: justin@thecogwheel.net.  I’ll be posting additional information shortly.

As usual I made up a video of making the tool and it also shows how I use it:


Vise Clamps and 1 Hour Red Rust Bluing

Let’s rewind to the summer when I purchased the Rong Fu milling machine for the shop.  The mill included an exceptionally well made French made Sagop milling machine vise that had a bit of wear but was very usable.  Up until this point I have never heard of Sagop before.

A quick search revealed a basic corporate webpage. It appears that Sagop is still in business and still manufactures a line of workholding products.  The vise that I purchased is the smallest of their precision CNC milling vises, a 100mm 800 series vise.  The construction of the Sagop is very similar to the Bison precision CNC milling vises.  I was also floored to learn the purchase price of this vise.  It is listed over 1000 euros with the swivel base – a number that is rather shocking when you consider that it is sitting on a Rong Fu milling machine!

The vise came with the swivel base – a very well made turntable base that allows for 360 degree rotation.  A very handy feature in some situations, but for most of the work that I do I usually just bolt the vise directly to the table.  This takes up less table space and is also more rigid.

Strangely the vise did not come with any way to mount it to the table.  Up until this point I had been using some of those standard import clamps that are sold everywhere.  This wasn’t the best solution as these clamps are quite bulky and don’t do the best job of holding in situations like this.  So set out and designed up some new clamps to be made.

But first I searched to see if I could find drawings of the vise and / or the swivel base, not only for this project but for future ones.  While not directly advertised on Sagop’s website, I managed to find the drawings for the vise and the swivel base:

Sagop 800 Series Vise Drawing  Sagop 800 Series Swivel Base

I modeled the clamp up in Fusion and made up a drawing of it based on the dimensions I found in the above pdfs.  Now some folks at this point say CAD is a waste of time for such simple projects, and it maybe for them.  But I’m actually quicker at modeling something up in CAD than I am drawing up a sketch on paper so for me I usually start with a 3D model.

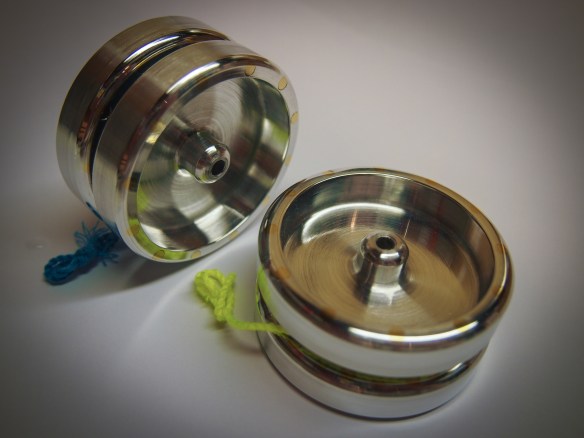
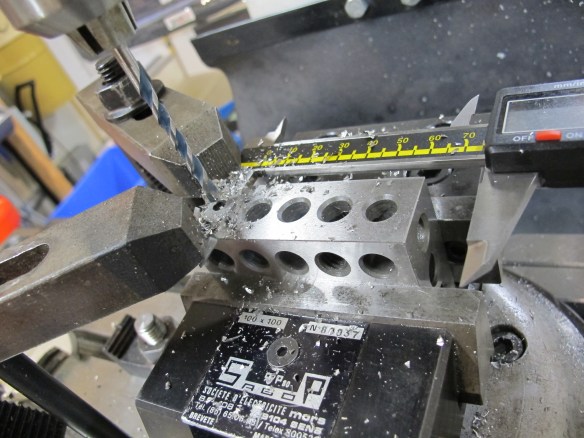
The clamps are designed for 3/8 cap screws.  I then made up a shop drawing for the clamps:

Sago Vise Clamp – (Rev 01)

Making the clamps was a very straightforward process. The most interesting part was when I used the 4 jaw chuck in the lathe to counterbore for the cap screws – I haven’t invested in any counterbore tools yet for cap screws.  I need to quit being so cheap.

When they were finished I started to wonder about how I was going to prevent them from rusting.  Rust is a very real problem in home shops, and in particular my shop as I live in a climate that is somewhat humid and has significant temperature swings.  If you are willing to deal with plating shops you might be able to find a shop to do a zinc coating – but for small one off parts it is often impossible on a budget as most plating shops have a minimum charge that far exceeds what home shop machinists can afford.

I have considered cold bluing products in the past as a simple method to provide some rust protection on parts.  In Canada cold bluing is a bit harder to procure than south of the border, and is is also somewhat expensive.  So I started to read up on other processes.  Hot bluing looked interesting, but involves some nasty chemicals.  Rust bluing looked promising but it seemed like a long process – you had to wait around for the rust to happen.

I did some more reading and I recalled an experiment we did in high school chemistry involving a mixture of hydrogen peroxide and salt applied to steel wool. The hydrogen peroxide and salt rusted the steel wool so quickly that you could measure the temperature change. I then did some further searching and I found a fellow Canuck who beat me to the idea of quickly rusting parts using hydrogen peroxide and salt: https://mypeculiarnature.blogspot.ca/2014/08/quick-rust-bluing-back-in-black.html

The process is very simple:

  1. Thoroughly Clean parts using a good degreaser.  This step is very important!
  2. Etch parts in acetic acid (common household vinegar)
  3. Rust parts using a warm hydrogen peroxide salt mixture.  You can either fully immerse the parts or brush the mixture on.  I mixed it up about 1/4 cup peroxide and 2 tablespoons of salt.
  4. Fully submerse parts in boiling water and watch red rust turn to black oxide.
  5. Lightly wipe or wire brush parts.
  6. Repeat steps 2 through 5 until you are happy with the coating.
  7. Dry parts and oil

The final result is a nice black oxide coating that helps protect against rust and looks great:

I made a video of the process, including the making of clamps:


Cross Slide Screw Support

A few weeks ago I finished a project that I had on my mind for a number of months.  There was a lot of play in the cross slide feed screw on my import bench lathe.  This showed up as backlash in the feed screw – when you grabbed the toolpost and applied force in alternate directions you could see the entire cross slide move back and forth.  Some of it was from backlash in the feed nut itself, but most of it was between the feed dial and the support casting itself.

I tried tightening up the nuts themselves tor reduce the amount of clearance – but then it bound and you couldn’t turn the feedscrew at all.  This wasn’t the best design from the get go.

The first thing I did was modeled the entire assembly up in Fusion to get a clear picture of what was going on – and to give a good starting point for the modification: 
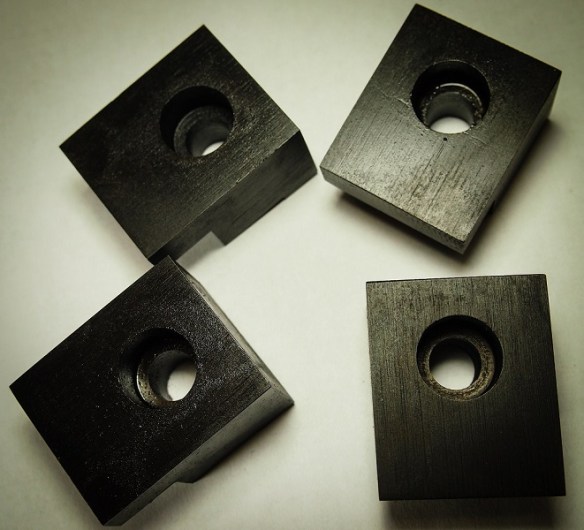
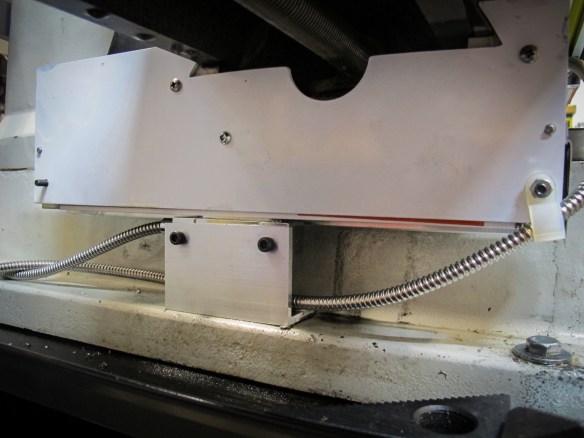
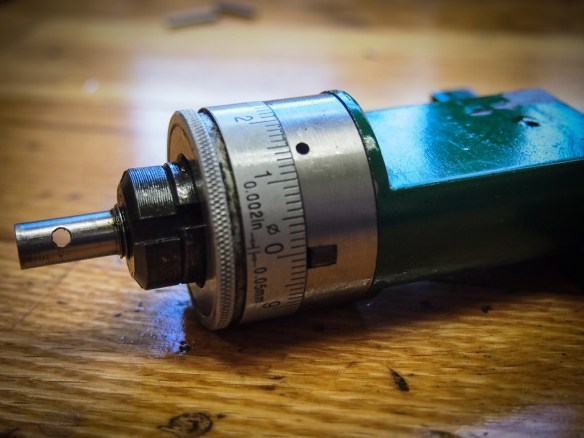
The nuts aren’t shown on the end of the feedscrew but you can see where the assembly is constrained for axial movement – at the right side on a shoulder machined into the feedscrew itself and on the left side the inner bushing of the dial.  These are just 2 plain bearing surfaces – and they weren’t machined the best to begin with.  No wonder it wasn’t the best!

I thought about doing what Stefan Gotteswinter did.  If this was my main lathe I would copy what Stefan did as it is the best solution by far.  Angular contact bearings are the way to go in this situation.  Since I’m keeping this lathe around primarily for cutting metric threads (the Standard Modern now in the shop doesn’t have a metric transposition gear) I decided to scale back the project and see if I could just stuff a deep groove axial bearing and a roller thrust washer into the space without having to modify the leadscrew, or make up a new dial.

Below is what I came up with:

I incorporated a deep groove ball bearing (6900-2RS) and a 10mm needle style thrust washer on the opposite side.  This required a new housing and the old cast iron bearing support to be shortened up.  The new housing was doweled to the cast iron block for location.  2 counter bored cap screws hold the entire assembly together.  The cross slide screw required minimal rework – a shoulder had to be turned for the bearing to sit against.  I also turned down the shoulder on the screw that previously was a bearing support.

The ball bearing is preloaded using the existing nuts.  Care needs to be taken not to overload the ball bearing as deep groove ball bearings aren’t primarily designed for axial load.  In retrospect I should have flipped the positioning of the deep groove ball bearing and thrust washer around when thinking about cutting forces as the cutting tool pushes away from the work piece.  If I have problems I can always make a new bearing housing.

The cross slide now is super smooth with no backlash due to the support.  There is a bit of backlash in the screw, but I don’t get too bothered by that on a manual machine.  It is significant improvement with not too much effort or time required.

I made a video of the entire project as well:


Tailstock Die (and tap) Holder

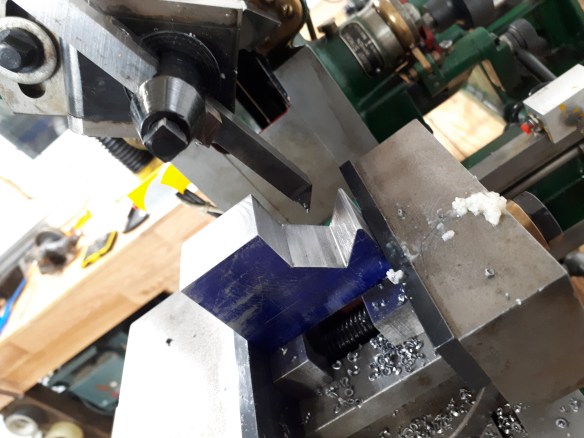
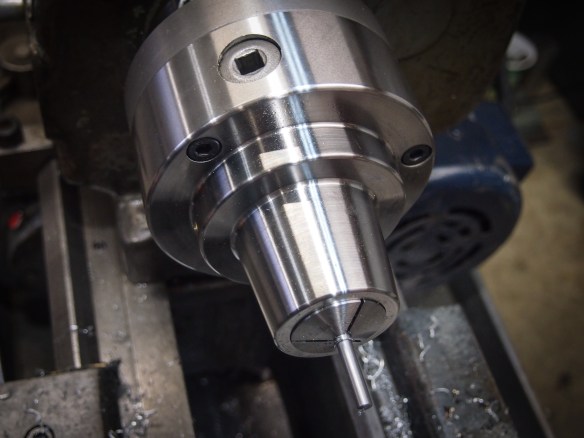
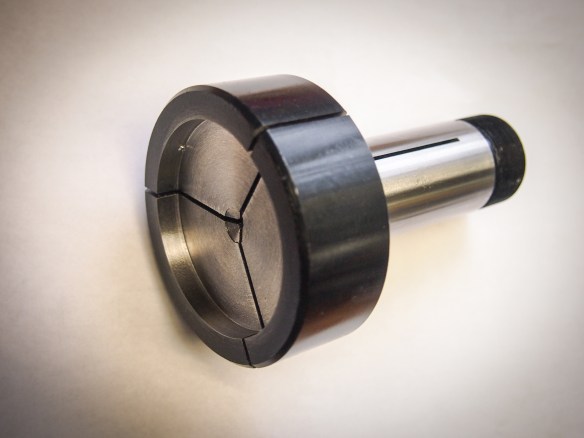
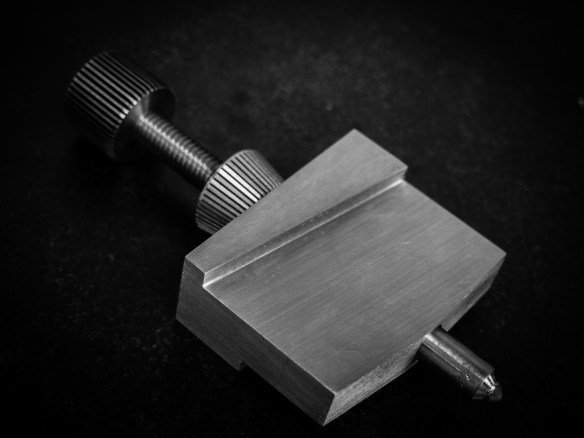
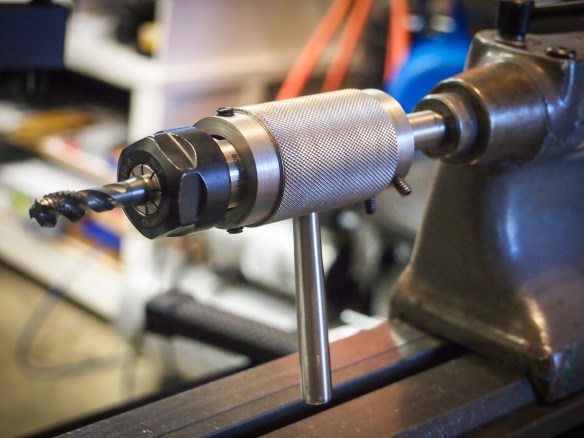
A few months ago I decided I had enough with using my traditional die holder in the lathe and set out to make a proper sliding die holder.  It is a very good beginner project that is straightforward to make and also is one that is exceptionally useful.

I started out with a design in Fusion.  The design consists of 3 manufactured parts, a body, an arbor, and a handle for extra leverage.  The body is designed to hold 1″ dies – a size that I have standardized on in my shop due to primarily expensive.  As die sizes climb the prices move up exponentially and due to that I generally single point large threads.  If you have larger dies the design is very easy to modify to accommodate larger dies.


Traditionally most people don’t use a sliding die holder to hold taps.  I’ve always started taps in the lathe using the tailstock.  If the tap is small enough I am brave enough to power tap – being sure to leave the tap a little loose to make sure when it bottoms out it slips to avoid broken taps.  I had the thought to incorporate an inexpensive ER collet chuck into the design to facilitate holding taps.  In this design the ER16 collect chuck stub is held in the end opposite to the die holder with a couple of set screws.

Besides being a pleasure to use with dies, it also works exceptionally well for small taps.  I don’t use the handle when I power tap with it – the handle is really only used for dies.  Now when you are tapping blind holes you can simply let go of the body and the entire body spins.  You can also feel when the tap reaches the bottom of the hole as the amount of force required to hold the body quickly climbs – at this point you simply let go, allow the body to spin and shut the lathe off.

Standard ER collets do a very good job of holding taps in the home shop.  You can get ER collets with an internal square that engages the tap drive but I’ve found it unnecessary for home shop work.  They are also more expensive and harder to find online – most industrial tool supply places can get them.

If you would like to build one yourself I made up a full set of drawings for the shop, and I’ll also provide 3D CAD in the zip file (iges and step):

Handle – (Rev 01), Body – (Rev 01), Arbor – (Rev 01), CAD – (Rev 01)

I also made a video the project:


The Future is Here: Introducing a Laser Bandsaw

A few months ago Max and I recorded a podcast where Max and I theorized on the what the home metal shop of the future would look like.  The podcast idea was inspired by the Making It podcast hosted by Jimmy Diresta, Bob Clagett and David Picciuto where they talked about what they think the future maker workshop will look like.  During the podcast Jimmy, Bob and David mentioned the idea of a laser bandsaw – something that Max and I also talked a bit about on our podcast.

A month or so after the podcast Rod Shampine reached out to me to talk shop over the phone one night.  I had a very enlightening conversation with Rod, who is an exceptionally gifted mechanical engineer with over 50 patents.  Rod also has his PhD and has worked on some exceptionally interesting projects – both on the job and for hobby.  He is an active home shop machinist as well.  Over the last few years Rod has done a significant amount of work in the 3D printing world – he is very active on Thingverse and also has did a significant amount of work on 3D printers themselves.

In the conversation Rod told me he had acquired all the hardware to put together a laser bandsaw prototype.  At first I thought he was making a joke, but he went into specifics about safety, power supplies and the actual laser itself.  Rod certainly had a workable design flushed out – one that both had us very excited.

In December Rod sent me an email that he had finished his laser bandsaw.  It could only really cut paper and balsa wood but to my knowledge it is the first working prototype of such a device.  Obviously a laser bandsaw is exceptionally hazardous – particularly to your eyes.  Rod pointed this out numerous times.  But with proper eye protection and proper design a device could be made to work.

Shortly afterward Rod posted his working prototype on Youtube:

So thanks to Rod the future is now here.  I’m watching with interest to see where this all goes.

$200 Shenzhen DRO (JCS900-2AE)

About 6 months ago I purchased a digital readout off eBay for the Rong-Fu mill drill. Originally I had planned to purchase either iGaging scales or standard import calipers and utilizing a tablet based DRO. Once I started looking at prices however I was shocked to find that for less than the price of either the iGaging scales or the import calipers I could have a full blown 2 axis DRO complete with proper glass scales.

I went ahead and ordered the scales off a eBay seller. It was a typical Chinese eBay seller that sells everything from DROs for machine tools to various useless cell phone and house gadgets. The total for the order was around $200 USD plus about $30 for shipping. I then communicated the scale lengths I needed via email. In about 2 days I had a shipping confirmation including a tracking number.

I was excepting to wait about 3-4 weeks for the shipment to arrive, typical of most stuff ordered from China. I was shocked at the end of the week when I received an email from DHL that my shipment was to arrive on the following Monday – about a week for the entire process! Sure enough Monday afternoon a DHL driver dropped off the 2 boxes.
The one box contained the DRO – a JingCE JCS900-2AE 2 axis DRO unit. The other box contained the 2 glass scales both of proper length. Also included was a large amount of hardware, mounting brackets and associated items you would need to install the DRO.

I spent the next few days thinking about how to mount the scales. The X axis was easy – I decided to mount it to the front of the table using the T slot already present. I thought about mounting it to the back of the table but I didn’t want to loose any Y axis travel. The Glass scales are rather bulky – something to note if you are considering installing them on a smaller mill like the X2 mini mill. The Y axis was a bit of a different story – there really isn’t anything to fasten the scales to. I decided to make up a bracket to hold the Y axis scale. That took a fair bit of work to do.

Y Axis Scale (behind the fabricated bracket)

X Axis Scale

After mounting the scales and trying out the DRO I also fitted a inexpensive import digital caliper to the quill to get a .001″ resolution readout for Z depth. This also took a few hours to do properly. 2 brackets were made out of aluminum to hold each end of the caliper. I modified the caliper using a Dremel tool. I drilled mounting holes using a standard off the shelf masonry drill bit – a poor man’s way of drilling hardened steel. High speed steel usually won’t touch hardened calipers.

Hard Drilling Using a Masonry Bit

After using the DRO for 6 months I can say that it is a very good unit. I haven’t had any issues. As far as accuracy and repeatability is considered, I really don’t have the proper measuring tools to qualify the DRO but I will say that I tested it using a dial indicator over the travel of the table. At each point where I tested the DRO it corresponded to the dial indicator – within at least .0005″ (as best as my judgment permits). I also ran the table up against a hard stop several times to test the repeatability and each reading was easily within .0005″. I probably should do a proper gauge R and R study on it, but just with the general testing I’ve done it’s easily within .001″. And to be honest doing work closer than .001″ on a Rong Fu mill drill is unreasonable.

I filmed and edited a number of videos showing the install and finally a video review of the DRO.  The first video shows the hard part: the installation of the Y axis scale.

The second video shows the installation of the X axis scale and also the mounting of a digital caliper on the quill.

The final video is me talking about the DRO itself and contains much of what is written here.

If you are interested in reading the manual, I scanned a copy of it and it is available here.

One thing to note is that you will get little to no support with the DRO. To me this isn’t a big deal at all when you consider the price. The next closest DRO in price in the North American market is approaching 4 times the cost. And the unit looks suspicious like this unit. If something breaks I am willing to try and fix the unit myself or simply replace it.
If I had a high end knee mill I would probably buy a Mitutoyo DRO and be done with it. But putting a Mitutoyo DRO on inexpensive import mills is a bit like putting lipstick on a pig.

It was a $200 well spent. Having a DRO on a milling machine is exceptionally handy. I won’t say it is a necessity, but it greatly improves your efficiency – especially on larger mills or making larger parts. Time will tell how durable the unit is but I think it is an excellent addition to a home metal shop.