Disclaimer: Bench Grinders are dangerous. If you improperly mount the grinding wheels they will explode and hurt or kill you. If you mount damaged wheels they will explode and hurt or kill you. Find someone to help you or educate yourself thoroughly on appropriate safety before attempting any work on a bench grinder. Attaching weights to the bench grinder to balance it is not a straightforward task. The weights could fly off when the machine is running and cause serious injury. Do so at your own risk!
There with that out of the way, I found another use for my smart phone in the shop: dynamically balancing my bench grinder.
Here is my bench grinder. It is a 8″ Ryobi from Home Depot. It spins at 3600 rpm which is a little fast for HSS tool bits but it works and has plenty of power for what I do. Of course I removed the wheels it originally came with and purchased 2 new CGW Abrasives wheels from a reputable tool supply house in my area.

Before we move on to balancing, let me say that I re-machined the wheel mounting hardware that came with my bench grinder so it was flat. I made new grinding wheel bushings for the wheels so they were mounted as true as I could get them. I also trued up the wheels with a diamond tipped dressing tool similar to this one: http://www.mcmaster.com/#grinding-wheel-truing-tools/=132y8pr
My bench grinder still vibrated. It wasn’t serious, and didn’t affect the grinding of high speed steel tools, but it bothered me. It was an inexpensive bench grinder, and I could go out and by a more expensive one, but most of the new ones all come from China anyway, and I was getting sick and tired of searching for sale posts for a good used Baldor for a reasonable price. So I decided to see if I could at least make things a bit better. I also know that surface grinding wheels are balanced when they are mounted.
First you need to know the mass of the entire grinder. I used a baby scale that we have around the home. Of course I had to remove the grinder from my grinding table.

I then determined the resonant frequency of my grinder. To do this you need to mount your smart phone to the bench grinder. I used zip ties, again. You can see some of my other ‘cell phone’ engineering on my other page where I analyzed my mini mill using my smart phone: https://thecogwheel.net/2016/06/27/x2-mini-mill-vibrations-and-chatter/

Next step was to determine the natural frequency of the system. With the grinder off, turn on your accelerometer app and tap the grinder with a dead blow hammer. I exported the results and took a look at the response in Excel. Here is what the chart:

Now you can see the wave is a little choppy. This is due to my smart phone’s accelerometer limitations. You could do much better with a higher quality accelerometer programmed using a micro controller (a Arduino works well!) but that wasn’t the point of what I was trying to do. I wanted to see if my smart phone would provide useful information because it is easy to use!
From the graph I found the period of the vibration to be 0.032891 seconds. The inverse of the period is the frequency, which is 30.403 Hz. Note this is the damped frequency, denoted Wd. From this point on some math is involved, you can view it in the spreadsheet posted below. If you want me to detail the math used, send me an email. Using the data the following was calculated:
| Damping Factor | 0.3890832 | |
| Natural Frequency | 33.00449108 | Hz |
| Natural Frequency | 207.3733334 | rad/s |
| Natural Frequency | 1980.269465 | rpm |
| Weight | 39.996 | lbs |
| Mass | 18.18 | kg |
| K (spring rate) | 781807.2555 | N/m |
| C (damping) | 47.7799696 | kg/s |
As we can see, my bench grinder’s natural frequency is around 2000 rpm. This means that it must accelerate through the natural frequency when it starts up. I plotted the a startup of my bench grinder using my cell phone to confirm my results. The very right of the chart shows the grinder running in steady state, or 3600 rpm. You can see the response is stable and repetitive at the right hand of the graph.

Not so good! Now this is a rotational imbalance problem. Essentially a unbalanced mass is causing the entire system to oscillate. This oscillate is the worst at the resonant frequency, but the unbalanced mass also contributes to the oscillation during steady state operation, in our case 3600 rpm. Can we calculate what this unbalanced mass is? Of course we can!
First we need to calculate what the response displacement is. To do this you need to find the maximum, vibration amplitude during steady state. My grinder had a maximum acceleration amplitude of 10.42 m/s^2 during steady state operation. To calculate what the displacement is you need to divide this number (subtracting gravity first!) by the rotational speed squared (converted to radians per second). You do all this and found my displacement to be 0.004292 mm. Once we have this, we have all the information we need to calculate what the unbalanced mass times radius factor (mR) that is causing this vibration.
We need to solve the following equation where X is the displacement, mR is the mass x radius due to the unbalanced mass, M is the mass of the entire system, r is the frequency ratio and zeta is the damping factor:
 Again some math is involved, you can view it in the spreadsheet posted below. If you want me to detail the math used, send me an email. Using the data the following was calculated:
| Max Amplitude | 10.42 | m/s2 |
| Gravity | 9.81 | m/s2 |
| Absolute Difference | 0.61 | m/s2 |
| Rotational Frequency | 3600 | rpm |
| Rotational Frequency | 60 | Hz |
| Rotational Frequency | 376.9911184 | rad/s |
| Frequency Ratio, R | 1.817934409 | |
| Displacement, X | 4.29208E-06 | m |
| Displacement, X | 0.004292078 | mm |
| Unbalanced Mass x Radius, mR | 6.38521E-05 | kgm |
| Unbalanced Mass x Radius, mR | 0.063852078 | kgmm |
| Radius of Required Mass | 20 | mm |
| Required Mass | 0.003192604 | kg |
| Required Mass | 3.192603888 | grams |
So there, we now know how much mass we need. Since I didn’t have any way to use my cell phone to figure out where the unbalanced mass was occurring (this would require a some sort of method to determine phase of the wave from, such as a proximity sensor trigger), I decided to stick on trial weights and move them methodically around the wheels and watch the response on my smart phone. After several tries I found a spot that was close to where it should be and proceeded to stick on the weights. I used little washers, and I placed them on each wheel.
I used the following mounting tape:

I mounted the weights on each wheel, covered them with high strength tape, and let it sit overnight (according to the tape’s instructions) to harden up.

I put the covers all back on and started it up. It ran much smoother, and my cell phone’s accelerometer showed significantly less vibration. I couldn’t get the weights placed perfectly to get rid of all vibration, so some is still present. But it is a lot better than it was.

I plotted the results of my grinder starting up and overlaid them over the results before I added the mass:
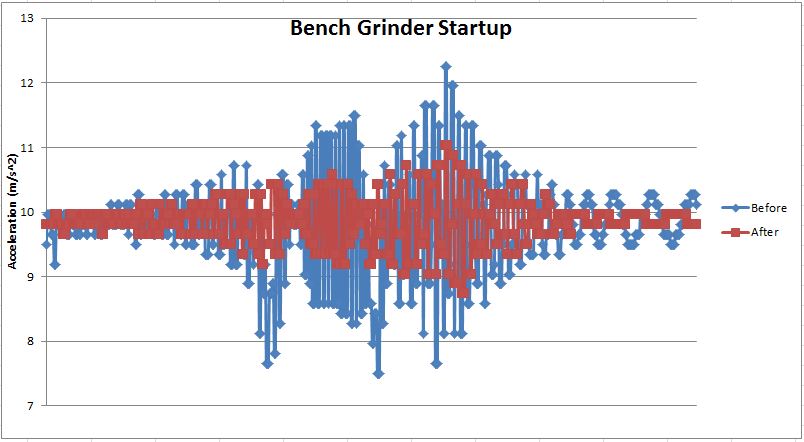
That looks a lot better!
In the future I am going to try to come up with a simple way to measure phase. This might involve a computer instead of a cell phone, but for now I’m much happier with my bench grinder. When it accelerates and decelerates it is much quieter and during operation you cannot tell it is running. Hey, its not a Baldor, but it works like one now!
You can view the spreadsheet I used to do the calculations: BenchGrinderAnalysis.


