
Let’s rewind to the summer when I purchased the Rong Fu milling machine for the shop. The mill included an exceptionally well made French made Sagop milling machine vise that had a bit of wear but was very usable. Up until this point I have never heard of Sagop before.

A quick search revealed a basic corporate webpage. It appears that Sagop is still in business and still manufactures a line of workholding products. The vise that I purchased is the smallest of their precision CNC milling vises, a 100mm 800 series vise. The construction of the Sagop is very similar to the Bison precision CNC milling vises. I was also floored to learn the purchase price of this vise. It is listed over 1000 euros with the swivel base – a number that is rather shocking when you consider that it is sitting on a Rong Fu milling machine!
The vise came with the swivel base – a very well made turntable base that allows for 360 degree rotation. A very handy feature in some situations, but for most of the work that I do I usually just bolt the vise directly to the table. This takes up less table space and is also more rigid.
Strangely the vise did not come with any way to mount it to the table. Up until this point I had been using some of those standard import clamps that are sold everywhere. This wasn’t the best solution as these clamps are quite bulky and don’t do the best job of holding in situations like this. So set out and designed up some new clamps to be made.
But first I searched to see if I could find drawings of the vise and / or the swivel base, not only for this project but for future ones. While not directly advertised on Sagop’s website, I managed to find the drawings for the vise and the swivel base:
Sagop 800 Series Vise Drawing Sagop 800 Series Swivel Base
I modeled the clamp up in Fusion and made up a drawing of it based on the dimensions I found in the above pdfs. Now some folks at this point say CAD is a waste of time for such simple projects, and it maybe for them. But I’m actually quicker at modeling something up in CAD than I am drawing up a sketch on paper so for me I usually start with a 3D model.
 The clamps are designed for 3/8 cap screws. I then made up a shop drawing for the clamps:
Sago Vise Clamp – (Rev 01)
Making the clamps was a very straightforward process. The most interesting part was when I used the 4 jaw chuck in the lathe to counterbore for the cap screws – I haven’t invested in any counterbore tools yet for cap screws. I need to quit being so cheap.
When they were finished I started to wonder about how I was going to prevent them from rusting. Rust is a very real problem in home shops, and in particular my shop as I live in a climate that is somewhat humid and has significant temperature swings. If you are willing to deal with plating shops you might be able to find a shop to do a zinc coating – but for small one off parts it is often impossible on a budget as most plating shops have a minimum charge that far exceeds what home shop machinists can afford.
I have considered cold bluing products in the past as a simple method to provide some rust protection on parts. In Canada cold bluing is a bit harder to procure than south of the border, and is is also somewhat expensive. So I started to read up on other processes. Hot bluing looked interesting, but involves some nasty chemicals. Rust bluing looked promising but it seemed like a long process – you had to wait around for the rust to happen.
I did some more reading and I recalled an experiment we did in high school chemistry involving a mixture of hydrogen peroxide and salt applied to steel wool. The hydrogen peroxide and salt rusted the steel wool so quickly that you could measure the temperature change. I then did some further searching and I found a fellow Canuck who beat me to the idea of quickly rusting parts using hydrogen peroxide and salt: https://mypeculiarnature.blogspot.ca/2014/08/quick-rust-bluing-back-in-black.html
The process is very simple:
- Thoroughly Clean parts using a good degreaser. This step is very important!
- Etch parts in acetic acid (common household vinegar)
- Rust parts using a warm hydrogen peroxide salt mixture. You can either fully immerse the parts or brush the mixture on. I mixed it up about 1/4 cup peroxide and 2 tablespoons of salt.
- Fully submerse parts in boiling water and watch red rust turn to black oxide.
- Lightly wipe or wire brush parts.
- Repeat steps 2 through 5 until you are happy with the coating.
- Dry parts and oil
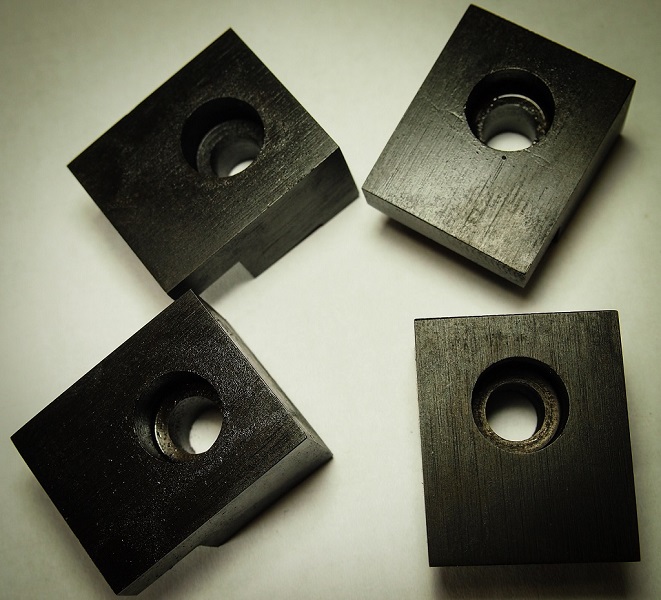
The final result is a nice black oxide coating that helps protect against rust and looks great:
I made a video of the process, including the making of clamps:

Hi Justin
How does this process compare to hot dipping in oil ?
Alan
LikeLike
Hi Alan, sorry for the delay in responding. My understanding of hot dipping in oil is that the oil (and I’m told the older the used motor oil the better) actually just stains the part. In rust bluing there is an actual chemical process happening on the surface of the steel. There are other methods to develop a black surface. Heating the part with a torch works as well, but again I’m not sure if this is just the carbon depositing itself upon the surface of the metal It is an exceptionally interesting topic – one that I need to do more research on.
LikeLike
In you youtube vid, you mentioned that if the rust bluing is done to hardened materials (like O-1?) that there was a chance of the metal cracking. I believe you said there was a precaution to reduce this. Where can I find out more?
Thank you,
Uncle Bob
LikeLike